Wonder Wednesday 79: Go Fly a Kite!
Happy Wonder Wednesday! I hope everyone has been having a great time in this past week since the equinox. Whether you are entering spring or fall, it’s a time of transition to explore and enjoy. So what better way to celebrate the traditional March winds than with a kite!
These little kites are easy to make and easy and fun to fly. I’ve never been that skilled at flying kites, and even I can fly these fun little kites!
Once you get yours made, seek out a local spring kite flying celebration and go fly a kite!
Wonder Wednesday 79: Go Fly a Kite!
These little homemade kites don’t need (or prefer) a very strong wind and work best on a nice steady breeze day. The are perfect for a spring afternoon and perfect for national kite month – April!
Materials
Rectangle Paper – construction, copy, handmade, manila drawing paper, or any lightweight paper in the shape of a rectangle
String – kite string or other similar type string. Thread is too thin and cotton yarn is too thick
Drinking straw
Tape – clear, washi, or other tape
Ruler
Pencil or marking pen
Awl or small hole punch
Light ribbon – I used 18 inches length so I could tie it into bows

Preparation
Decorate the paper with drawings or paintings of spring if you like. I used decorative paper here.

Procedure
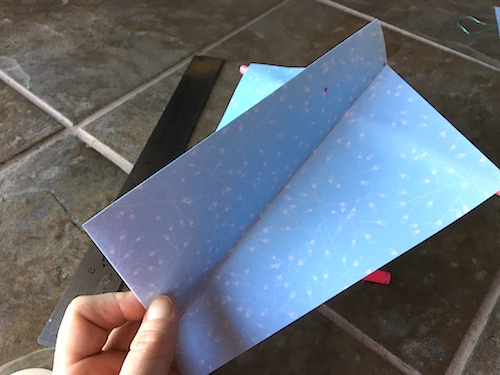
Fold the paper in half short end to short end. Then make a dot approximately 1 inch from the fold at the top and 1 inch from the open edge at the bottom. Draw a dotted fold line if you like.

Fold on the dotted line.

Flip the paper over and fold the other side to match.

Tape the fold together.

Flip the taped side down and crease the fold so it stands up if needed, just to adjust the shape and folds of the kite.

On the taped “face” side of the kite, tape a drinking straw across the front to add structure

Flip the kite face down, on the “wing” and measure about 1/3 down from the top and 1/2 inch in from the fold and make a dot.

Poke or punch a hole on this dot. Place a small piece of tape over the hole on each side to reinforce the hole. Then, punch through the tape as well.
Tie the string through the hole and leave the spool attached or allow for a long amount of string so you can fly the kite high!

Tape your ribbon kite tail to the bottom of the kite face. Tie bows if you like.
Head outside for some kite flying fun!
You may need to make some adjustments – if the kite won’t fly, cut the tail a bit shorter. If the kite sags in the air, reel the string in. If it tugs too much, let the string out. Enjoy the learning process of making and flying kites! Now, go fly a kite!
Extensions
Go out into nature and draw all the signs of spring you find on your piece of rectangular paper. Use this paper to make your spring kite!
Try using even bigger sized papers to make big and really big kites! Just adjust your cross bar by using long bamboo skewers, straws taped together, or even a very light dowel rod, and your tail ribbon. Regular kite string is fine to use with all sized kites.
If doing this with young children, let them decorate the paper first with watercolor paint, then the adults later make the kites.
With older children, have them decorate, do the precise measurements when assembling the kite, and learn about how and why kites fly. (see the Seeds to Sprout section for a link on why and how kites fly.)
Seeds to Sprout:
Learn more about why kites fly from the National Kite Month website!


