Wonder Wednesday #33: Up-cycled Sprouting
This lesson makes a great indoor garden learning activity for the end of school, a summer camp project, or for simply celebrating summer gardening itself! And it teaches ideas about recycling and upcycling as a bonus!
The CD cases act as little greenhouses for sprouting the seeds. Use this project to enhance seed studies, sprouting observation journal work, sustainability studies, recycling work, or as a fun garden craft with ages 3-12.
Wonder Wednesday #33
Up-Cycled Seed Sprouting
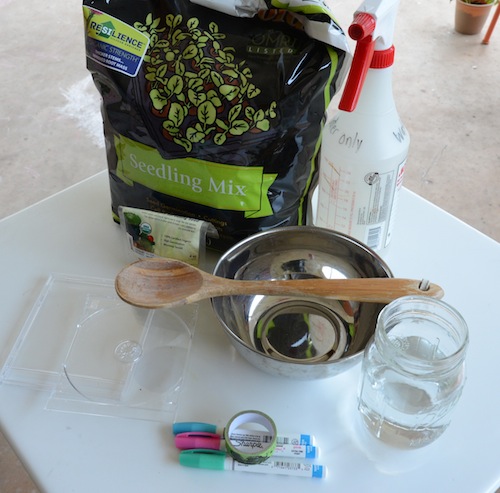
Materials
Old clear plastic CD cases (Raid your closet, check thrift stores, or ask record shops if they have any to donate)
Soil – I like the Seedling sprouting soil because it is so light, but you can use any potting soil.
Radish seeds
Water
Mixing bowl
Mixing spoon
Spray bottle with water
Nature journal
Optional: washi tape/ paint markers
Preparation
Depending on the amount of upcycled cases you will be sprouting, decide how much soil you will need. Each case takes about 1/8 cup or a small handful of wet soil.
Put the soil into a mixing bowl and wet the soil by pouring some water in and mixing it up. Soil should be wet but not soupy soggy.
If done ahead of time, put the lid on the bowl or into a ziploc bag to keep the soil moist. If preparing more than a day in advance, put the wet soil in the fridge so it doesn’t get funky all wet and sealed up.
Remove all paper inserts from the cases as well as the plastic insert that locks the cd in place.
Procedure
Introduce this activity to the children as appropriate to whatever lesson you are using it as an enhancement – seed sprouting, parts of a sprout, summer solstice, etc.
Add the soil to the cd case by pressing a layer of soil flat across the bottom of the case. The bottom is the end that opens and shuts. You will see the hinge end is always open. This is where the air flows in.
Once the soil is pressed down, it should not be deeper than the thickness of the case and it should fill up the case no more than 1.5 – 2 inches high, max.
Place the radish seeds in a row across the bottom about 1/2 inch up from the actual bottom edge. I used radish seeds because I love the way they sprout so quickly. You know I love those radish seeds!
Press the seeds into the soil, but you don’t need to bury them.
If the soil seems a little dry from making it ahead of time, give it a spritz or 2 with the water bottle and close the case.
Place the cases side by side on trays in a sunny window and watch for them to sprout!
If they appear to be drying out, just spritz water from the spray bottle down the gap in the hinge side of the case. Easy!
Once the seeds sprout, stand the cases up. Why? Great question. Once sprouted the shoots want to grow up and the roots down. If the cases are left flat, the sprouts will get all curly.
Document your observations in your nature journal each day. If the case starts to fog up, that’s okay. If the fog is hindering the observation work, just carefully open the case and wipe off the fog with a paper towel.
Optional: If you are making these as a living cards type gift, for say summer solstice, before giving, add decorative washi tape to the bottom to hold it shut and add your message and decorations with paint pens.
Extensions: Try different seeds like watermelon, grass, and tomato. See what happens. Which work best? Does one grow or transplant better than the others or look better? Document your observations and findings in the nature journal.
Try growing some cases horizontally and other vertically. This can make an interesting experiment in itself. Observe and then research why sprouts want to grow up under all circumstances and roots down.
Comments are closed.